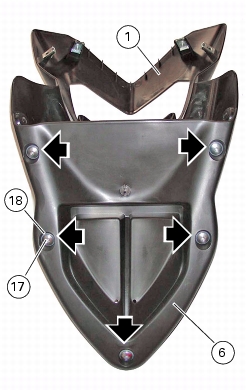
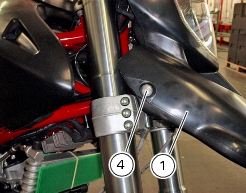
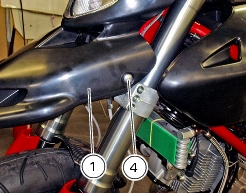
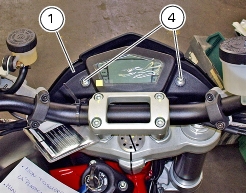
1 -
1
2
3
4
5
6
7
8
9
10
11
12
13
14
15
16
17
18
Parts catalogue
Caution
Bold reference numbers in this section identify parts shown in this exploded view diagram. These parts do not appear in the figures near the text.
Removing the hand guard - rear-view mirrors
Disconnect the connector (A) of the turn indicator from the wiring.
Unscrew the screws (16) and remove U-bolt (13).
Loosen screw (11) and remove the hand guard/rear-view mirror assembly (9) from handlebar.
Proceed in the same way to remove the hand guard/rear-view mirror assembly (10).
Refitting the hand guard - rear-view mirrors
Start screw (11) in its thread on hand guard/rear-view mirror assembly (9), fit washer (12), bush (14) and bush (15).
Install the hand guard/rear-view mirror assembly (9) onto handlebar and tighten screw (11).
Refit U-bolt (13) on handlebar, tighten the screws (16) to the specified torque (Sect. C 3, Frame torque settings).
Connect the connector (A) of the turn indicator to the wiring.
Proceed in the same way to refit the hand guard/rear-view mirror assembly (10).
Removing the headlight fairing
Loosen and remove the screws (4) securing the headlight fairing (1) to headlight mount and keep the washers (5).
Loosen and remove the screws (4) securing the headlight fairing (1) to headlight lower bracket and keep the washers (5).
Remove the complete headlight fairing (1) from the vehicle.
Disassembling the headlight fairing
Loosen the screws (17) securing the mudguard (6) to headlight fairing (1); keep the washers (18).
Reassembling the headlight fairing
Ensure that clips (3) are in place on headlight fairing (1).
Start the screws (17) with their washers (18) into the mudguard (6).
Assemble mudguard (6) to headlight fairing (1) and tighten the screws (17) to the specified torque (Set. C 3, Frame torque settings).
Refitting the headlight fairing
Position the headlight fairing (1) on headlight mount and start the retaining screws (4) complete with their washers (5) in their holes.
Tighten the screws (4) to the specified torque (Sect. C 3, Frame torque settings).
1