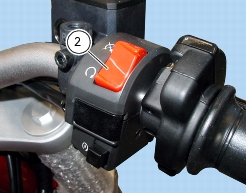
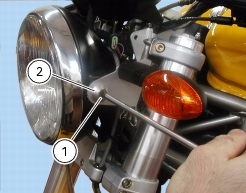
4 -
Changing light bulbs
Changing the headlight bulbs
Before replacing a burnt-out bulb, make sure that the new bulb complies with the specified voltage and wattage (Sect. C 1.1, Lights / instrument panel).
Warning
Headlamp halogen bulbs become hot when turned on and stay hot for some time after they are switched off. Allow bulbs to cool down before changing them.
 
To gain access to headlight bulbs, loosen the lower screw (1) securing the frame/reflector unit to the headlight body.
Remove the connector (2) from the bulb.
Release the bulb retaining clip (3) and take bulb out of mount.
Fit a bulb of equal rating (Sect. C 1.1, Lights / instrument panel).
Note
Be careful to hold the new bulb at the base only. Never touch the transparent body with your fingers or it will blacken resulting in reduced bulb brilliancy.
 
Insert the locating pins of the bulb base into their seats to obtain correct alignment.
Hook the clip (3) to the headlamp holders.
Connect the cables previously disconnected.
To replace the bulbs of the parking light, remove the connector (4).
The bulb has a bayonet fitting. Press and twist clockwise to extract.
Position the new bulb. Press and turn counterclockwise until it becomes properly seated with an audible click.
Refit the connector and secure the rim/reflector assembly in place.
Replacing the number plate light bulbs
Remove the bulb holder from the inside of the number plate holder to gain access to the number plate bulb (5). Remove the bulb and fit a new bulb.
Changing the headlight
To remove the headlight, loosen the screws (1), collect caps (2). Disconnect connector (3) from front wiring.
Loosen screws (4) to remove turn indicators.
Headlight support (5) is secured to the steering head by means of threaded vibration dampers (6). Vibration dampers (6) and screws (7) secure the instrument panel to the steering head.
Headlight support (5) is secured to the bottom yoke by means of screws (8).
High beam relay
It is located next to the batteries and secured to battery mount. To gain access to this component it is necessary to lift the fuel tank (Sect. L2, Removing the fuel tank).
High beam relay (1) was added to the system in order to control the light automatic switch-off strategy, i.e.:
1
2
If this strategy is not working, check system operation.
Checking high beam relay operation
Remove relay (1) from its support and power contacts (86) and (85) (small contacts) with 12 V (battery). The electric magnet must click.
Connect a multimeter across contacts (30) and (87) (large contacts) and ensure it reaches full scale (analog multimeter) or beeps (digital multimeter). If not, replace checked part.
Beam setting
The motorcycle must be perfectly upright with the tires inflated to the correct pressure and with a rider seated.
Position the motorcycle 10 meters from a wall or flat surface.
On the wall or surface, draw a horizontal line at the same height from the ground as the centre of the headlight and a vertical line aligned with the longitudinal axis of the motorcycle.
Note
This check should preferably be carried out in a well-shaded area.
 
Switch on the low beam. The height of the upper limit between the dark area and the lit area must not be more than nine tenths of the height of the centre of the headlamp from the ground.
Note
This is the procedure specified by Italian standards to check the maximum height of the light beam.
To adjust the height of the light beam, turn the adjusting screws (1) that retain the headlamp to the side supports.