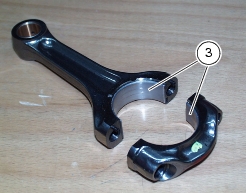
9.3 -
1
2
3
4
5
6
7
8
9
Parts catalogue
Caution
Bold reference numbers in this section identify parts shown in this exploded view diagram. These parts do not appear in the figures near the text.
Removing the connecting rods
The crankshaft now features more centralized weights and lubrication hole in different positions, thus ensuring a stiffer and more reliable behaviour, subject to less vibrations.
Open the casings and slide out the crankshaft (7) complete with the connecting rods (2).
Disassembling the connecting rods
To disassemble the connecting rods, unscrew the bolts (1) and separate the connecting rods from the crankshaft.
Caution
Do not confuse the connecting rods at reassembly. Fit them in the original mounting position.
Overhauling the connecting rods
Run the following dimensional checks on the connecting rods:
-
Change a connecting rod when badly worn (Sect. C 1.1, Cylinder / piston).
Connecting rod small end bush must be in good condition and firmly set in its seat.
Measure parallelism error 100 mm away from the longitudinal axis of the connecting rod:
H less h must be lower than 0.02 mm. If not so, change the connecting rod.
Two different types of con-rods are now available, A and B, depending on big end diameter (Sect. C 1.1, Cylinder / piston) as punched on con-rod bearing cover.
Use crankshafts and connecting rods from the same class.
Changing the connecting rod small end bush
Pull out the worn bush with a suitable drift and press.
Drill the new bush at the same positions of the oil holes of con-rod small end.
Bore out bush until obtaining a bore diameter (D) of 20.035-20.045 mm.
Changing the connecting rod big end bearings
Change the bearings (3) every time the engine is overhauled.
Spare bearings are supplied ready for installation. They must not be reworked with scrapers or emery cloth.
Two different size classes are available, each marked with a different colour: YELLOW or BLUE.
They consist of an outer steel support and an inner lead-base layer obtained through electroplating.
The table below shows bearing color to be selected according to crankshaft and con-rod classes.
 
 
Overhauling the crankshaft
The main bearings journals and the crank pins must not be grooved or scored.
Threads, keyways and slots must be in good condition.
Check for fretting or burrs in the fillet between crank pin and shoulder.
Fillet radius: 2 mm.
Use a micrometer to measure oval and taper of the crank pin. Measure oval and taper in several different directions.
Use a dial gauge to measure the alignment of main bearing journals with the crankshaft placed between two centers.
Clean inner channel of the crankshaft at each overhauling.
Recommended values are specified under Section C 1.1, Cylinder / piston.
Two different crankshafts are now available, A and B, depending on crank pin size as punched on web side on sprocket side.
Undo all crankshaft plugs (4) and (8). If they are hard to remove, heat plugs to remove the threadlocker used at assembly.
Clean all lubrication ducts with suitably sized metal brushes and blow with compressed air to remove any deposits preventing proper oil circulation.
Apply DUCATI liquid gasket to the threads of the plugs (4) and (8) and then refit them.
Tighten all plugs to the specified torque (Sect. C 3, Engine torque settings).
Big end bearings-crank pin clearance
To check clearance between big end bearings and crank pin, use a GREEN “Plastigage PG-1” bar (A) on the crank pin. Fit the connecting rod with the original bearings. Tighten the bolts to 50 Nm.
Remove the connecting rod and check thickness of the bar looking at the reference line (B).
Replace the bearings or the crankshaft if the thickness measured (the clearance) is not within the specified limits (Section C 1.1, Cylinder / piston).
 
Reassembling the connecting rods
Before reassembly, check that main bearing journals and crank pins are free from burrs and fretting: use fine emery cloth and oil, if necessary.
Check that splines are in perfect condition and without signs of shrinkage.
Make sure each connecting rod (2) has its locating pins (D) in place between cap and shaft.
Wash pins and dry them with compressed air.
Clean and lubricate con-rod bearings (3) and crank pin with engine oil. Refit the con-rods in their original mounting position.
Fill the recommended grease into the two ends of the hole to lubricate threads and underside of the new bolts (1) and the thread of the shaft.
Warning
Corrosion and irritant hazard. The grease is an irritant. Avoid contact with skin and wear protective gloves.
Caution
Failure to grease the con-rod bolts will lead to incorrect clearance and breakage.
Fit the spacer part no. 88713.1309 between the con-rods and take up the residual axial play with the fork feeler gauge part no. 88765.1000 available in 0.1 - 0.2 - 0.3 mm.
Tighten the screws (1) as described:
Lubricate with the recommended grease;
first tighten to 20±1Nm;
secondly tighten to 32±1Nm;
Tighten to 67 Nm.
 
Refitting the connecting rod unit
Install the complete connecting rod units (7) and (2) inside casing, proceed to shimming and close casings as described in Sect. N 9.2, Casing unit: crankcases.
Caution
Make sure that the connecting rods (2) are correctly positioned in the cylinders. Incorrect positioning will inevitably lead to reopening of the casing.
 
1